

There‘s a mass movement of beautiful, appetizing food online, it’s made itself clear on Pinterest and Instagram. And a million other sites geared towards folks just like us who love every aspect of food! Enticing food photography seduces us down paths of new recipes and inspires us to create new dishes. It’s been said you eat with your eyes first!
carte du jour
TogglePin for Reference!📌
Tip: Be sure to shoot in RAW file format, if your camera has the capability. When you edit RAW files, you can adjust white balance, exposure, contrast, highlights, and 100 or more combinations and never lose the original data. And if you decide that you’re not happy with the direction you’ve gone, you can revert the image and start over without losing precious data.
How to Import Photos into Lightroom
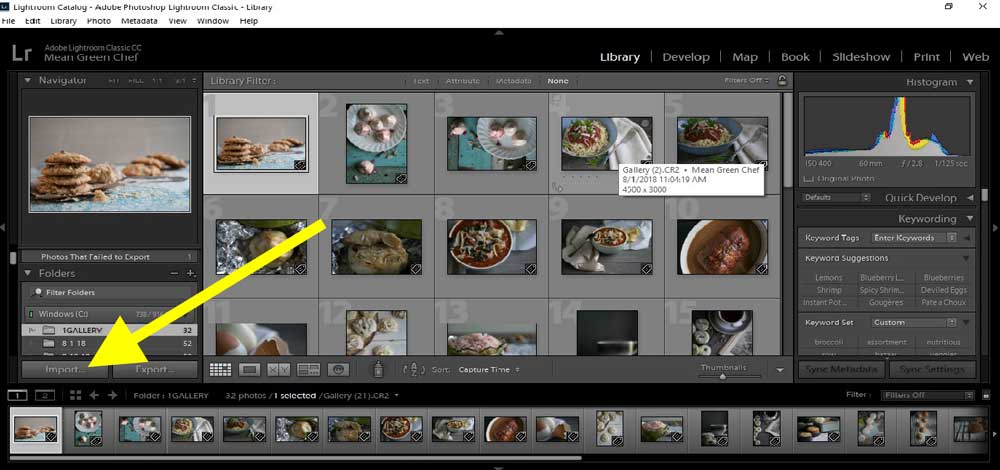
From the Library Module, in the left-hand pane, click on Import and then navigate to the folder and select it by clicking on it. Once it’s highlighted, you’ll see all the photos load into the library.
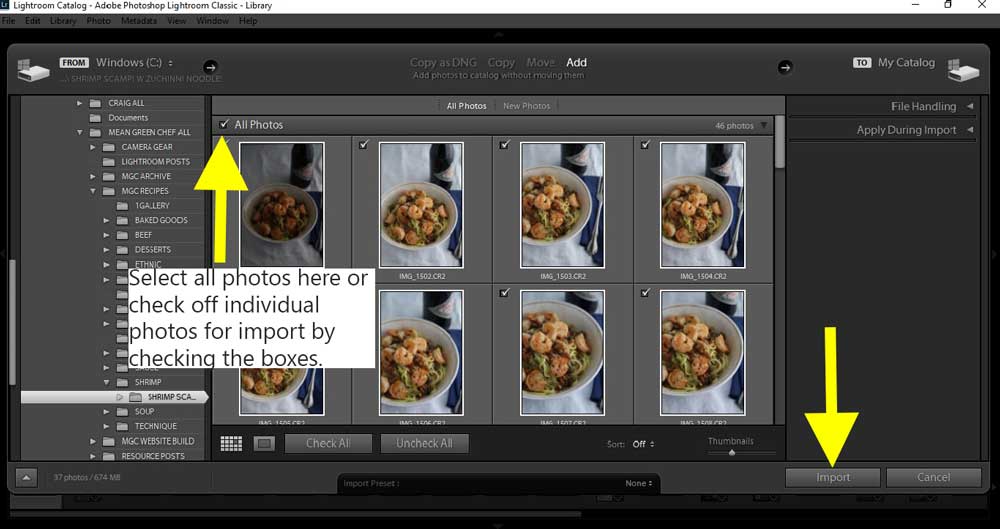
All the photos in the file load onto the screen, from there you can select all or choose specific photos you want to import for editing. Once you have the photos selected, click the Import button on the right-hand side and they will Import into the Library Module.
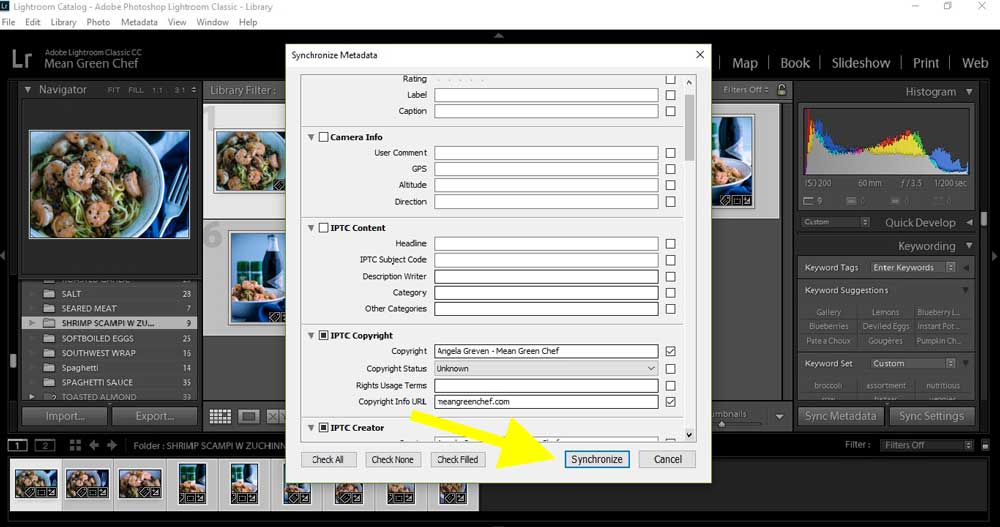
Tip: If you want to add metadata to your photos for copyright info, keyword tags etc., click the Sync Metadata button. Go through the list and add the info you want attached to your photos and then click Synchronize.

Tip: As you adjust your photographs watch the Histogram in the upper right-hand corner. For more information on how to read a histogram check this article out from Digital Camera World!
How to Use Basic Editing Tools in Lightroom
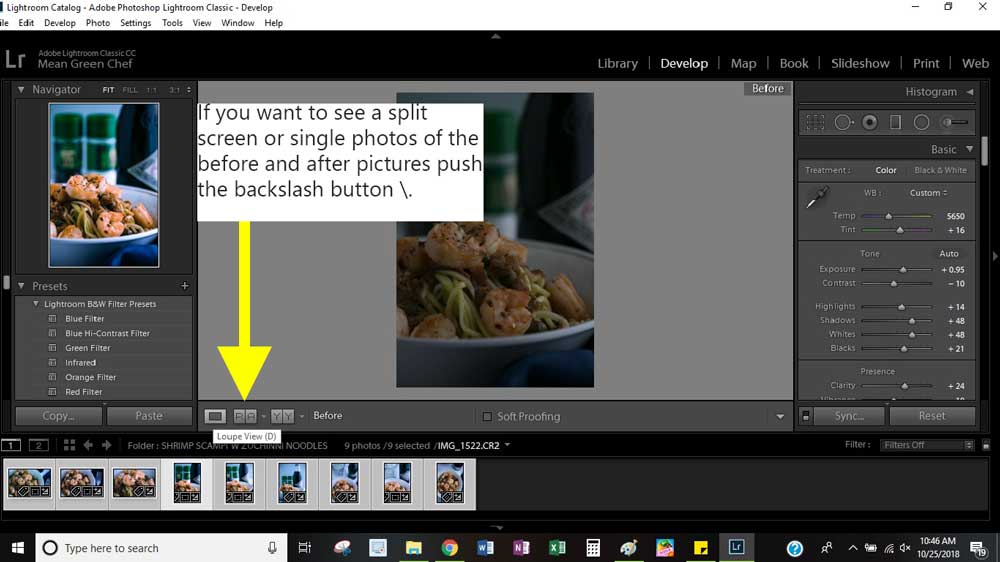
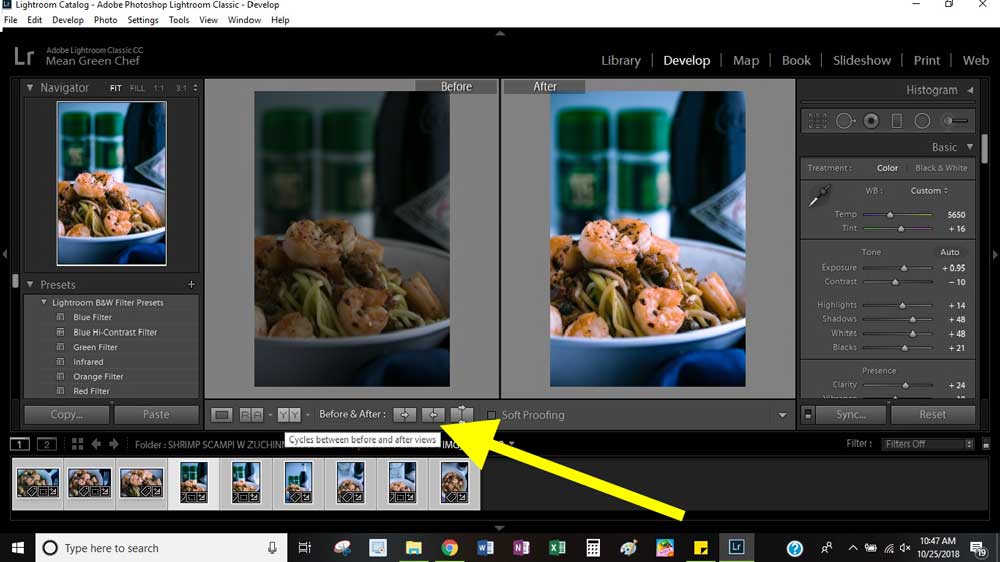
If you want to see a split screen or single photos of the before and after pictures click the backslash button \. You can cycle between a single photo view, both before and after and also use a split screen to see changes side by side.
Editing Process in Lightroom
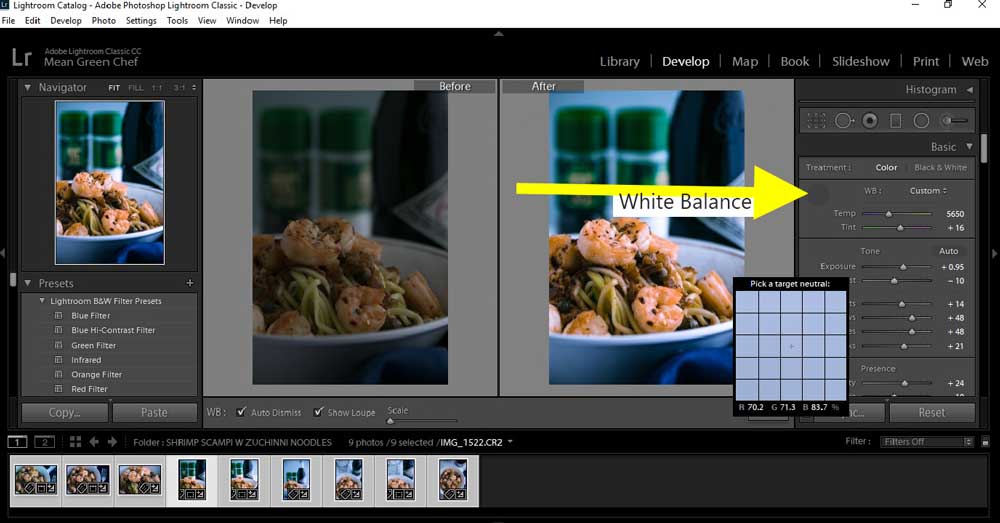
- White Balance: Check your white balance: If you select the eyedropper tool and select a neutral area, this will automatically adjust the white balance. It may not be the correct balance though, and you can continue to tweak it either with the eyedropper or the sliders on the right-hand side.
Adjusting Tone
- Exposure: Fine-tune your exposure up or down. Lightening or darkening the entire image, depending on the result you want.
- Contrast: Calibrate contrast, when increased or decreased the adjustments darken the darker mid-tones and lighten the lighter mid-tones across the photograph.
- Highlights: Adjust to reduce blowouts of light, or brighten areas that are underexposed. For more details in shadows increase the slider.
- Shadows: A great change that allows you to lighten deep shadowed areas of a photo. Or darken them to create a moody photograph. Shadows adjust the left central area of the Histogram.
- Whites: Lighting slider that makes whites pop, just be watchful for blowouts which is where you will lose detail and data.
- Blacks: Another darkening and lighting slider that gives further depth and dimension, Blacks control the far left area of a Histogram. A great way to build dimension and details.
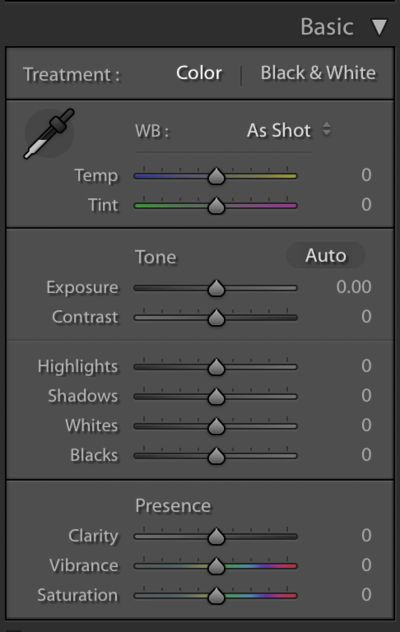
Presence Adjustment Levels
- Clarity: Adds subtle or pronounced texture and detail.
- Vibrance: Incrementally increases the intensity of subdued colors and leaves saturated colors untouched.
- Saturation: Allows you to adjust the saturation of colors in the image, dragging it right to brighten and deepen the colors in the photo and left to decrease.
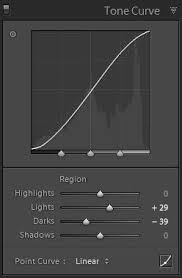
Tone Curve Adjustment
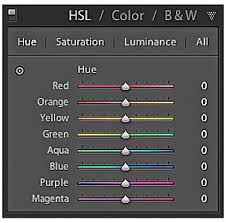
Hue, Saturation, & Luminance
HSL stands for Hue, Saturation, and Luminance. This tool allows you to control colors individually, so you can enhance one specific component of your photo without changing the entire thing. This a powerful element in LR and it allows you to get super creative.
- Hue: Changes shades of colors, a blue iced cupcake can become robin egg or royal blue with the hue slider.
- Saturation: Makes that blue more or less saturated with color when sliding +/-.
- Luminance: Adjusts how bright or dull a color appears.
Split Toning
- Split Toning: An undervalued tool, add it to your workflow to make your images your own! Split toning is a separation between the lights and darks of an image and their individual colors. This tool only affects colors and not shadows, brightness or whites. It allows you to change the feel of an image.
Detail Section
A powerful sharpening tool, with explicit control when sharpening images. when sharpening images, be sure you zoom in and view our images at full size 100%.
The Sharpening Tool (Detail Section) has 4 different sliders.
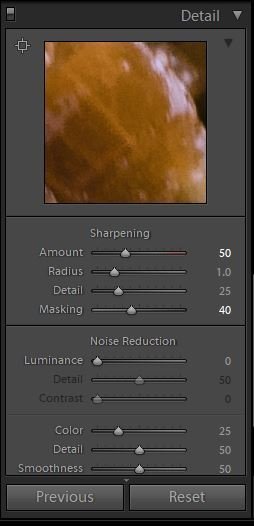
- Amount: Amount of sharpening you want to apply to an image. The higher the number the more sharpening you will see. Too much sharpening increases noise levels, causing a grainy photograph. I generally have 50 set as my default value, but occasionally increase or decrease the amount depending on the image.
- Radius: The size of the sharpening area around the edges. The default is 1.0, meaning that LR will apply sharpening over 1 pixel around the edge. Increasing the radius results in heavier, murky edges. I leave mine at the default value of 1.0.
- Detail: Controls the amount of sharpening on the details of an image. A low value such as 1 will only sharpen the heavy details in an image while 100 would sharpen the image in its entirety. I set mine at 45 as a default, but adjust down or up if needed. Remember the higher the number the more noise your image will have.
- Masking: Masks off areas you don’t want sharpened, beneficial for images that have subjects isolated from the background.
Lens Correction, Transform, Effects, and Camera Calibration
This section allows for corrections of issues such as chromatic aberration, distortion, vignetting and perspective correction.
Lightroom is a Powerful Tool
No matter what your vision and signature style is for your food photography and blog, Lightroom is a gateway to transform your vision into reality. If you have questions, please leave a comment and we’ll be happy to help out! Be sure to check out our Camera Gear!
Stay on top of current food blogging tips, techniques, photography, styling and more. We only send relevant info and will never sell our e-mail list or spam. Thank you for reading, drop any questions you have below!
Further Resources for Food Bloggers
Pin for Reference!📌
Step Into My Kitchen!

Hey there, fellow food enthusiast! Welcome to Mean Green Chef, where every dish tells a story and every recipe is a labor of love. I’m thrilled to share a bit about myself and the journey that led me here, stirring pots and sprinkling spices for over three decades!


Just a quick heads up – you might notice some affiliate links sprinkled throughout our site. If you decide to click on them and make a purchase, rest assured, it won’t cost you extra. Instead, you’ll be helping to support our blog and keep the kitchen fires burning. Thanks a bunch for your support!